How to Connect a Camera to a Computer

Last Updated on by Daniel Lawrence

If you’ve been using your newly purchased camera for quite a while, the memory may be full and the need for additional space may arise. Therefore, to create more space for your camera memory card you need to know how to connect a camera to a computer.

When you connect a camera to a computer, it will enable your save or copy all the pictures and videos on the camera to your computer. And once you have a copy saved on your laptop, you can then conveniently erase the files on the cameras memory card.

Unfortunately, not everyone knows the process on how to connect a camera to a computer to save their files. Most times people often take out the full memory card and insert a new one. But why waste money on buying a new memory card when you can easily transfer the files to a computer and continue using the same memory card.

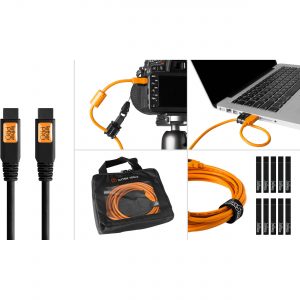
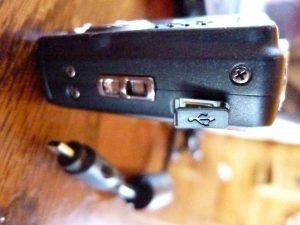
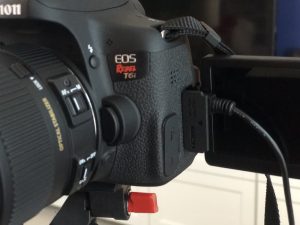
 Here, we’ll show you how to properly connect a camera to a computer and save your photos. Simply follow the steps given below and you’ll have no problem at all.

Connect a Camera to a Computer

Remember, not all cameras are the same. However, this article will show you the general steps to take in other to connect a camera to a computer.

Gather All of the Needed Components

How to Connect a Camera to a Computer

All you need to download photographs to a PC should just be a USB cable, a PC with a USB opening, and your camera.

You can’t utilize only any USB link to download your photographs. Most simple to use cameras utilize mini USB connectors, and just certain USB links will contain the right connector for your camera.

The camera manufacturers ought to have incorporated the right USB link in your camera’s pack. On the off chance that you can’t locate the right link, you may need to take your camera to a hardware store or an office supply store and buy a link that has the right size USB connector. With this in place, you ready to go.

Search for the USB Slot on the Camera

How to Connect a Camera to a Computer

After assembling all the necessary tools, you’ll have to discover the USB opening on your camera. This progression can be somewhat tricky in light of the fact that camera makers now and then shroud the space behind a board or entryway, and they typically attempt to make the board or entryway mix into the general structure of the camera.

This best way to find the USB spot on any camera is to search for the USB logo on it. For example, this one, the board will have a USB logo on it. You likewise may see the USB logo beside the board. Some camera producers place the USB space in a similar compartment as the battery and memory card.

Look on the sides of the camera and the base of the camera for the USB opening. On the off chance that you can’t discover the USB space, check your camera’s manual.

Attach the USB Cable to the Camera

How to Connect a Camera to a Computer

The next step on how to connect a camera to a computer is to associate the USB link to your camera. When doing this, don’t utilize a ton of force. The USB connector should slide into the camera’s USB space reasonably effectively, without much power required.

To maintain a strategic distance from issues, make sure you have appropriately adjusted the USB connector to the USB space. In the event that you attempt to embed the USB connector “upside down,” it won’t go into the opening appropriately. It may fit with a great deal of power behind it, yet on the off chance that you power the connector into the space upside down, you’ll likely harm the USB link and the camera.

Moreover, ensure the board or entryway that stows away and secures the USB space is totally off the beaten path. In the event that the board is excessively close, you could squeeze the board between the link and the opening, and the connector won’t embed completely, leaving the USB link incapable to work.

At last, try to embed the USB link into the USB space, as opposed to another opening, for example, an HDMI space. In many cases, the camera producer will incorporate both a USB space and an HDMI opening behind a similar board or entryway.

Connect the USB Cable to the Computer

How to Connect a Camera to a Computer

Next on how to connect your camera to your computer is to interface the furthest edge of the USB link to the computer itself. The opposite finish of the USB link ought to have a standard USB connector, which should fit in a standard USB opening.

Once more, you shouldn’t require a great deal of power to make the association. Make sure to embed the USB connector with the USB logo confronting upward, or you’ll wind up trying to embed the connector the wrong way, and it won’t work.

Power the Camera

Now, with the USB link associated with the two gadgets, ensure the PC is fueled up. At that point turn on the camera. With certain cameras, you’ll additionally need to press the “photograph playback” button (which for the most part is set apart with a “play” symbol as you’d see on most DVD player).

In the event that everything is associated effectively, your camera may give you an “interfacing” message on the​ LCD screen, has appeared here, or a comparable sort of message or symbol. A few cameras give no sign, however.

Check if the Camera Is Recognized

Once the PC/camera association is effective, you should see a popup window on the PC screen. The popup window should give you a couple of choices for downloading the photographs. Simply select one and adhere to the on-screen guidelines. If nothing shows or pops up, check the USB connection and make sure it’s properly connected.

Install the Camera Software/Drivers

If you are using a new modern PC, the PC ought to consequently perceive and discover the camera after you’ve associated it, without expecting you to introduce any extra software.

However, if your PC can’t recognize your camera, notwithstanding, you may need to introduce the camera’s product. Use the CD that accompanied your camera into the PC and follows the on-screen instruction for installation.

Download/ Save Your Photos

When you instruct the PC on how you’d like to download the photographs, you ought to have the option to advise the PC where to store the photographs. At that point, click the “download” or “save” button, and the download procedure should begin.

With most PCs, you should see improvement bars that reveal to you how rapidly the download is occurring. You likewise may see little review windows that demonstrate to you what every photograph resembles.

Finish Organizing the Photos

Finally, on how to connect your camera to your computer, When the majority of the photographs are downloaded to the PC, the PC may give you the choice of erasing the photographs from the camera’s memory card or survey them. I would suggest not erasing the photographs from the memory card until you’ve got an opportunity to make a backup of the recently downloaded photographs.

Glance through the photographs – while it’s still new in your mind where you shot them and what you are attempting to achieve with the photographs – and erase any poor ones. Taking some additional time currently will spare you time over the long haul.

More often than not, the camera gives programmed, nonexclusive names to the photographs. It’s consistently a smart thought to give the photographs a name that will be simpler for you to perceive as you’re glancing through them later.​

Actually, you can use your android phone as a webcam using USB. And you can use your android as webcam even without wifi by connecting it to your PC via USB cable. Connect the phone to your computer via USB (don’t select storage mode if the phone asks while connecting USB). Download DroidCam from android market, install it and open it on your phone. With that, you are good to go.
First, you will need to Install Security IP Camera Software (CMS) on your PC or laptop. It’s usually on the CD that came with the camera. Start by plug-in the power source and network cable to the camera. Take the other side of the network cable and connect it to the router. You should see light is on at the camera cord. Once it connected, you can then run the surveillance software which will enable you to see what the camera is seeing and then make adjustments to the cameras positions if need be.

Conclusion

If you’ve tried all you can and was unable to connect your camera to your computer, even after you’ve counseled your camera’s client control for guidelines explicit to your camera, you try using another computer or take the memory card to a photo lab where you can copy the pictures into other storage media like CD, DVD or a flash drive.